咖啡丶七

自律给我自由

安装

不同ubuntu版本的net版本都有不同的命令,具体可以直接访问官方下载渠道

在 ubuntu 22.04 中下载 .net9 流程如下

.NET在 Ubuntu .NET backports 包存储库中提供。 若要添加存储库,请打开终端并运行以下命令:

1
sudo add-apt-repository ppa:dotnet/backports

安装 SDK

.NET SDK 允许使用 .NET 开发应用。 如果安装 .NET SDK,则无需安装相应的运行时。 若要安装 .NET SDK,请运行以下命令:

1
2
sudo apt-get update && \
sudo apt-get install -y dotnet-sdk-9.0

若要了解如何使用 .NET CLI,请参阅 .NET CLI 概述

安装运行时

ASP.NET Core运行时允许您运行那些未包含运行时的.NET应用程序。 以下命令安装 ASP.NET Core运行时,这是.NET最兼容的运行时。 在终端中,运行以下命令:

1
2
sudo apt-get update && \
sudo apt-get install -y aspnetcore-runtime-9.0

作为 ASP.NET Core 运行时的替代方法,可以安装不包含 ASP.NET Core支持的 .NET Runtime:将上一命令中的 aspnetcore-runtime-9.0 替换为 dotnet-runtime-9.0

1
sudo apt-get install -y dotnet-runtime-9.0

dotnet诊断工具

安装

1
2
dotnet tool install -g dotnet-counters
dotnet tool install -g dotnet-gcdump

验证

1
dotnet-counters --version

不安装的话可以使用最简单的命令先查看一下

1
cat /proc/50594/status | grep VmRSS

查看

1
dotnet-counters monitor -p 50594

面板会变成

1
2
3
4
5
6
7
8
9
10
11
12
13
14
15
16
17
18
19
20
21
22
23
24
25
26
27
28
29
30
31
32
33
34
35
36
37
38
39
40
41
42
43
44
45
46
47
48
49
50
51
52
53
54
55
56
57
58
59
60
61
62
Press p to pause, r to resume, q to quit.
Status: Running

Name Current Value
[System.Runtime]
dotnet.assembly.count ({assembly}) 149
dotnet.exceptions ({exception})
error.type
-----------------------
BadHttpRequestException 4
# 服务器启动以来 GC 次数
dotnet.gc.collections ({collection})
gc.heap.generation
------------------
gen0 209,056
gen1 107,853
gen2 721
# 服务器启动以来累计分配量 8.8TB
dotnet.gc.heap.total_allocated (By) 8.8668e+12
# 堆碎片,详情解锁见下面
dotnet.gc.last_collection.heap.fragmentation.size (By)
gc.heap.generation
------------------
gen0 0
gen1 111,336
gen2 3.9331e+08
loh 15,980,504
poh 0
# 当前堆大小————————最重要的数据——————最近一次GC结束后,各代还剩多少对象
dotnet.gc.last_collection.heap.size (By)
gc.heap.generation
------------------
gen0 0
gen1 5,212,680 # 5MB
gen2 4.5019e+09 # 4.5GB
loh 73,186,232
poh 4,157,640
# 当前 GC 向操作系统申请的总内存
dotnet.gc.last_collection.memory.committed_size (By) 4.6749e+09
dotnet.gc.pause.time (s) 6,179.84
dotnet.jit.compilation.time (s) 5,113.575
dotnet.jit.compiled_il.size (By) 4.6519e+08
dotnet.jit.compiled_methods ({method}) 19,333,691
# 锁竞争次数,对于运行了19小时的服务器不算离谱
dotnet.monitor.lock_contentions ({contention}) 6,563,268
dotnet.process.cpu.count ({cpu}) 4
dotnet.process.cpu.time (s)
cpu.mode
# system vs user : 16% vs 84% 很正常
--------
# 内核消耗CPU的时间,如Socket、文件IO、网络发送、epoll、线程切换
system 10,128.697
# 我的代码消耗CPU的时间,如Update()、Move()、Battle()、AI()
user 53,776.818
# 当前真正占用物理内存,就是 Linux 的 RES VmRSS对应的数据。
dotnet.process.memory.working_set (By) 4.8229e+09
# 任务堆积数量
dotnet.thread_pool.queue.length ({work_item}) 0
# 线程池线程数
dotnet.thread_pool.thread.count ({thread}) 6
dotnet.thread_pool.work_item.count ({work_item}) 2.1725e+08
dotnet.timer.count ({timer}) 5

解释
gen0–>gen1–>gen2 为代系,gen0是刚创建的,gen1是经过几次GC后还活着的,gen2是活了很久的

loh = Large Object Heap 大对象堆,如果对象>85000字节就会进入LOH

pho = Pinned Object Heap 固定对象堆,一般游戏服务器用的很少

堆碎片:

类似:[对象][空洞][对象][空洞][对象]GC回收后产生的空隙

4.5GB对象中间有393MB空洞不算特别严重


用户

切换用户

完全模拟{username}登录,运行其个性化配置的程序

1
sudo -i -u {username}

临时使用以{username}身份,在当前目录执行一个命令,环境变量无所谓

1
sudo -u {username} -s

创建用户

1
sudo useradd -m -s /bin/bash {username}
  • -m:创建用户的同时,创建用户的/home/{usrname}目录
  • -s /bin/bash:指定用户的默认登入shell为Bash

如果不用-s /bin/bash会出现无法使用上下左右方向键的问题
使用cat /etc/passwd可以看到{username}的登入shell是/bin/sh
使用ls -l /bin/sh,发现/bin/sh -> dash
修改连接目录sudo ln -sf /bin/bash /bin/sh,重新登入账户就可以了

1
sudo passwd {username}

为新用户设置密码,需要输入两次

删除用户

1
sudo userdel -r {username}

删除用户及其相关的文件,包括/home/{username}文件

给新用户root权限

通过将新用户添加到sudo组来给予root权限

1
sudo usermod -aG sudo {username}

验证:执行sudo ls /root,需要输入用户密码确认权限

注意:

如果使用的是VSCode连接的服务器,可能会出现每次连接后该用户的分组(输入Gropos查看)不是最新的问题。

原因:

VSCode Remote SSH 会:

  • 保持长连接

  • 复用 ssh control master

  • 后台常驻 vscode-server

你以为重新连接了,其实还是原来的ssh session

解决方法:

原因清楚之后,就很好解决了,只需要将VSCode Remote SSH完全断开就好了

  • 在VSCode中使用快捷键Ctrl+Shift+p
  • 输入Remote-SSH: Kill VS Code Server on Host
  • 选择你的服务器,并输入密码
  • 重新启动VSCode

另外,如果你使用VSCode,你可能会随时出现__vsc_prompt_cmd_original: command not found报错,所以在使用VSCode之前,建议将VSCode设置中的terminal.integrated.shellIntegration.enabled关闭。但是如果你此时已经使用VSCode登录过的话,那只能在.bashrc文件中添加unset PROMPT_COMMAND再使用source ~/.bashrc使应用更改

即使给了sudo权限之后,该用户在第一次使用sudo的时候后需要输入密码,比较不方便,解决方法:

  • 使用sudo visudo -f /etc/sudoers.d/wordswar进入nano编辑器界面
    • visudo 是专门用来编写sudoers的,防止语法错误导致不能再使用sudo命令了
  • 然后输入{username} ALL=(ALL) NOPASSWD:ALL
    • All任意主机
    • (ALL)以任意用户身份执行
    • NOPASSWD:不需要密码
    • ALL所有命令
  • Ctrl+O,底部会出现File Name to Write: /etc/sudoers.d/wordswar.tmp
  • 直接回车Enter即可保存
  • Ctrl+X退出nano
  • 如果没有问题会直接返回shell,如果有问题会提示syntax error

此时{username}就可以不用再输入密码直接使用sudo命令了

查看用户和组

命令 解释
cat /etc/passwd 列出所有用户信息,每一行对应一个用户
who或者w 查看当前登入的用户
id {username} 查看指定用户

/etc/passwd文件内容:

1
2
root:x:0:0:root:/root:/bin/bash
steam:x:1000:1000::/home/steam:/bin/sh

使用:分割

  • steam:用户名
  • x:加密的密码字段(为了安全不再存在该文件下,而是存在/etc/shadow下)
  • 1000:用户ID(UID)
  • 1000:组ID(GID)
  • **:用户描述信息,一般为空
  • /home/steam:用户的主目录
  • /bin/sh:用户登入的shell
命令 解释
cat /etc/group 查看所有组,每一行对应一个组
groups {username} 查看{username}所在组

防火墙

基础命令

基础命令 效果
systemctl start firewalld.service 开启防火墙
systemctl status firewalld.service 查看防火墙状态
systemctl stop firewalld.service 关闭防火墙
systemctl enable firewalld.service 开启时自启
systemctl disable firewall.service 关闭开机自启
systemctl is-enable firewall.service 查看服务是否开机自启
systemctl --failed 查看启动失败的服务列表

配置防火墙

命令 效果
firewall-cmd --zone=public --list-ports 查看开放的端口
firewall-cmd --reload 重新载入防火墙
firewall-cmd --zone=public --add-port=80/tcp --permanent 开放80端口,--premanent表示永久开放,重启后也依然开放

每次在配置完防火墙之后需使用firewall-cmd --reload更新配置


文件操作

快捷方式

ln -s /usr/local/nginx/sbin/nginx /usr/bin/nginx

实时查看log文件

1
tail -f /path/to/your/logfile.log
1
less +F /path/to/your/logfile.log

常用命令

cat 查看文件
touch 创建文件
mkdir -p 创建文件夹(-p 创建缺失的父目录)
cp fileName 复制文件(后面的地址,不用加文件名)
mv 移动文件
mv 修改文件名称
rm 删除文件
rm -r 删除空文件夹 -f 强制删除,不用确认
find / -name “Log.Develop.20260514??.Debug.log” 查找文件
cd
pwd 显示当前所在路径
cd - 返回上一次所在路径

文件详情

1
-rwxrw-r--   1 ubuntu root 1249 May 22 01:09 init.vim
  1. 第一个字符:表示类型

    • -:普通文件
    • d:目录
    • l:软链接
  2. 后续9个字符:表示权限

    • rwx:所有者可读可写可执行
    • rw-:所属组可读可写
    • r–:其他用户仅可读

    文件权限

    r:4 w:2 x:1

    owner = rwx = 4+2+1 =7

    chmod [-R] xyz

    将owner/group/others及其子文件都设置为可读可写可执行

    chmod -R 777 fileName

    • -R:递归所有子目录和文件

    修改文件所有者:注意两个不一样,一个是chmod一个是chown

    chown -R ubuntu:ubuntu /data/wordswar-fantasy

    • 设置为ubuntu用户,和ubuntu用户组
  3. 硬链接数

    • 表示该文件的硬链接数量为1(即无其他硬链接指向此文件)
    • 如果是目录,此数字表示子目录数(至少为2,含 ...

    硬链接是同一个文件的多个名称(类似于一个人的多个别名)。

    删除原始文件或任一硬链接,只要还存在至少一个硬链接,文件数据就不会被真正删除。

    用途:

    1. 备份与冗余:通过硬链接保护重要文件(删除一个不影响其他)。
    2. 节省空间:多个硬链接共享同一份数据,不占用额外磁盘空间。
    3. 版本控制:某些工具(如 Git)内部使用硬链接优化存储。
    1
    2
    3
    4
    5
    6
    7
    8
    9
    10
    11
    # 创建硬链接
    echo "Hello" > original.txt
    ln original.txt hardlink.txt # 创建硬链接

    # 查看 inode(确认是否相同)
    ls -i original.txt hardlink.txt
    # 输出示例:12345 original.txt 12345 hardlink.txt

    # 删除原始文件后,硬链接仍可访问
    rm original.txt
    cat hardlink.txt # 正常输出 "Hello"
  4. 所属者和所属组

    • 所有者为ubuntu(所有者(Owner):当前拥有文件控制权的用户(不一定是创建者)。)
    • 所属组为root
  5. 文件大小

    • 1240字节(默认单位是字节,使用ls -lh可显示易读单位)
  6. 最后修改时间


端口

netstat -lntp 查看网络连接状态和端口情况
netstat -tlnp | grep :20000 查看20000端口网络状态
lsof -i :5000 查看5000端口的进程PID,然后可以使用sudo kill 关闭这个进程

进程

top 查看系统实时状态,可以使用top -b -d 10 -n 10 > top_log.txt 来将内容保存下来(每十秒保存一次,共保存10次)
ps -ef 查看所有进程可以通过 ps -ef | grep 来筛选
ps aux | grep nginx 查看nginx的进程

解压/压缩

.tar tar xvf FileName.tar 解压
tar cvf FileName.tar DirName 压缩 tar cvf {newname.tar} {path/to/name}
.tar.xz tar xvf FileName.tar.xz
tar cvf FileName.tar DirName
.tar.gz tar zxvf FileName.tar.gz
tar zcvf FileName.tar.gz DirName
zip unzip FileName.zip
zip FileName.zip DirName

在重装linux系统后,vscode无法连接,可能是ssh秘钥变了

报错内容,提示C:\\Users\\coffeeofnosugar/.ssh/known_hosts:10第10行,那就删掉这一行。如果还是不行,那就删除掉有相同ip的行

1
2
3
4
5
6
7
8
9
10
11
12
13
14
15
16
17
18
19
20
21
22
> Please contact your system administrator.
> Add correct host key in C:\\Users\\coffeeofnosugar/.ssh/known_hosts to get rid of this message.
> Offending ECDSA key in C:\\Users\\coffeeofnosugar/.ssh/known_hosts:10
> Host key for 42.192.110.49 has changed and you have requested strict checking.
> Host key verification failed.
> The process tried to write to a nonexistent pipe.
[23:47:27.438] "install" terminal command done
[23:47:27.438] Install terminal quit with output: Host key verification failed.
[23:47:27.438] Received install output: Host key verification failed.
[23:47:27.438] WARN: $PLATFORM is undefined in installation script output. Errors may be dropped.
[23:47:27.439] Failed to parse remote port from server output
[23:47:27.439] Resolver error: Error
at y.Create (c:\Users\coffeeofnosugar\.vscode\extensions\ms-vscode-remote.remote-ssh-0.123.0\out\extension.js:2:722235)
at t.handleInstallOutput (c:\Users\coffeeofnosugar\.vscode\extensions\ms-vscode-remote.remote-ssh-0.123.0\out\extension.js:2:720316)
at t.tryInstall (c:\Users\coffeeofnosugar\.vscode\extensions\ms-vscode-remote.remote-ssh-0.123.0\out\extension.js:2:842913)
at async c:\Users\coffeeofnosugar\.vscode\extensions\ms-vscode-remote.remote-ssh-0.123.0\out\extension.js:2:801927
at async t.withShowDetailsEvent (c:\Users\coffeeofnosugar\.vscode\extensions\ms-vscode-remote.remote-ssh-0.123.0\out\extension.js:2:805164)
at async A (c:\Users\coffeeofnosugar\.vscode\extensions\ms-vscode-remote.remote-ssh-0.123.0\out\extension.js:2:798392)
at async t.resolve (c:\Users\coffeeofnosugar\.vscode\extensions\ms-vscode-remote.remote-ssh-0.123.0\out\extension.js:2:802578)
at async c:\Users\coffeeofnosugar\.vscode\extensions\ms-vscode-remote.remote-ssh-0.123.0\out\extension.js:2:1095407
[23:47:27.443] ------


swap

什么是 swap

当机器所需内存突然膨胀到超出最大内存,linux 会启动 Out Of Memort Killer 直接干掉一个服进程,服务器就会挂掉。如果有 swap, linux 就会把一些不常用的内存页写到磁盘,这样服务器就还能继续运行。但 swap 的速度可能会比内存的速度慢1000~10000倍。

大小选择

  • 4G服务器 –> Swap 1~2GB
  • 8G服务器 –> Swap 2~4GB
  • 16G+服务器 –> Swap 2GB

创建步骤

1
2
3
4
5
6
7
8
9
10
// 创建
sudo fallocate -l 2G /swapfile
// 设置权限
sudo chmod 600 /swapfile
// 格式化
sudo mkswap /swapfile
// 启用
sudo swapon /swapfile
// 查看
free -h

开机自动挂载

1
sudo nano /etc/fstab

末尾加入

1
/swapfile none swap sw 0 0

保存即可

或者使用echo '/swapfile none swap sw 0 0' | sudo tee -a /etc/fstab


ncdu

安装

1
sudo apt install ncdu

基本使用

1
2
3
4
5
6
7
8
# 分析当前目录
ncdu

#分析指定目录
ncdu /home/user

#分析整个跟目录(需要sudo)
sudo ncud /

快捷键

按键 功能
上下箭头 选择文件/目录
Enter 进入选中的目录
左箭头 返回上级目录
d 删除选中的文件/目录(会确认)
n 按文件名排序
s 按文件大小排序(默认)
g 按文件大小排序(显示百分比条)
t 切换是否显示目录总大小
c 显示/隐藏子项目数量
r 刷新/重新扫描当前目录
q 退出 ncdu
? 显示帮助菜单
i 显示选中文件/目录的详细信息

truncate命令

truncate 是 Linux 中用于调整文件大小的命令。

它最大的特点是:

  • 可以快速清空文件内容
  • 可以把文件截断到指定大小
  • 可以扩展文件到指定大小
  • 不会删除文件本身及其权限

例如日志文件太大:

1
truncate -s 0 access.log

执行后:

1
ls -lh app.log

显示:

1
-rw-r--r-- 1 ubuntu ubuntu 0 Jun 19 11:00 app.log

文件还在,但内容被清空了。

这相当于:

1
> app.log

或者:

1
echo "" > app.log

truncate 更直观。


定时任务

1
2
3
4
// sudo的定时任务
sudo crontab -e
// 用户自己的定时任务
crontab -e

第一次使用时可能会出现

1
2
3
4
5
6
7
8
9
10
ubuntu@VM-1-7-ubuntu:~$ crontab -e
no crontab for ubuntu - using an empty one

Select an editor. To change later, run 'select-editor'.
1. /bin/nano <---- easiest
2. /usr/bin/vim.basic
3. /usr/bin/vim.tiny
4. /bin/ed

Choose 1-4 [1]:

是让你选择编辑文件的方式,选1或2都可以

进入后,可以在文件的最后添加

1
2
// 每天的凌晨3点执行 /usr/bin/truncate -s 0 /home/ubuntu/nginx/logs/access.log
0 3 * * * /usr/bin/truncate -s 0 /home/ubuntu/nginx/logs/access.log
1
2
3
4
5
6
7
8
9
10
┌──────── 分钟 (0 - 59)
│ ┌────── 小时 (0 - 23)
│ │ ┌──── 日期 (1 - 31)
│ │ │ ┌── 月份 (1 - 12)
│ │ │ │ ┌ 星期 (0 - 7)
│ │ │ │ │
│ │ │ │ │
0 0 * * *

分钟 小时 日 月 星期
1
2
3
4
5
6
7
8
9
0 0 * * *	// 每天0点执行
0 * * * * // 每小时执行
*/5 * * * * // 每5分钟执行
0 3 * * * // 每天凌晨3点执行
0 3 * * 1 // 每周一凌晨3点执行
0 3 1 * * // 每月1号凌晨3点执行s
0 0 1 1 * // 每年1月1日凌晨0点执行
0 1,13 * * * // 每天1点和13点执行
0 9-18 * * * // 9点到18点,每小时执行一次

安装

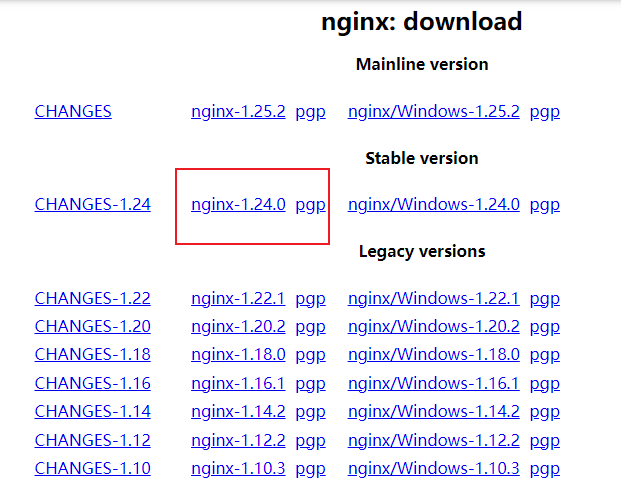
下载包体

网站:nginx: download

上传解压

tar -zxvf nginx-1.24.0.tar.gz

编译

./configure --prefix=/usr/local/nginx --with-http_stub_status_module --with-http_ssl_module

make

make install

在执行./configure时如果出现报错缺少对应的模块,则安装对应的模块,详情可见最后的常见问题

  1. 缺少PCRE,安装命令:sudo apt install libpcre3 libpcre3-dev

  2. 缺少SpenSSL,安装命令:sudo apt install libssl-dev

环境配置

设置快捷键

ln -s /usr/local/nginx/sbin/nginx /usr/bin/nginx

这样执行/usr/bin/nginx就相当于执行了/usr/local/nginx/sbin/nginx

而/usr/bin/是全局可用的,所以在任何地方输入nginx都可以执行/usr/lcoal/nginx/sbin/nginx

使用下面命令实时查看log更新

1
less +F access.log

常见问题

  1. 需要安装PCRE开发库

    1
    2
    3
    4
    ./configure: error: the HTTP rewrite module requires the PCRE library.
    You can either disable the module by using --without-http_rewrite_module
    option, or install the PCRE library into the system, or build the PCRE library
    statically from the source with nginx by using --with-pcre=<path> option.

    解决方案:

    1
    2
    3
    4
    5
    6
    7
    8
    # Ubuntu/Debian
    sudo apt update
    sudo apt install libpcre3 libpcre3-dev

    # CentOS/RHEL/Fedora
    sudo yum install pcre pcre-devel
    # 或
    sudo dnf install pcre pcre-devel
  2. 需要安装OpenSSL开发库

    1
    2
    3
    4
    ./configure: error: SSL modules require the OpenSSL library.
    You can either do not enable the modules, or install the OpenSSL library
    into the system, or build the OpenSSL library statically from the source
    with nginx by using --with-openssl=<path> option.

    解决方案:

    1
    2
    3
    4
    5
    6
    7
    8
    # Ubuntu/Debian
    sudo apt update
    sudo apt install libssl-dev

    # CentOS/RHEL/Fedora
    sudo yum install openssl openssl-devel
    # 或
    sudo dnf install openssl openssl-devel
  3. 如果在访问不了网站,并且error.log出现权限不足(Permission denied)的问题,需要从两个地方排查

    • 在启动nginx时需要用root权限sudo nginx
    • 配置文件中的#user nobody;改为user ubuntu。去掉#,将ubuntu改为当前用户名

安装

下载包体

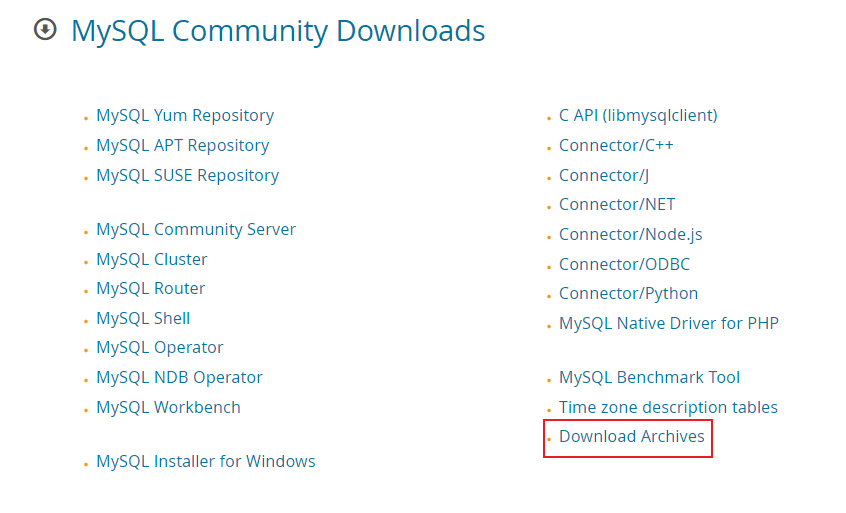
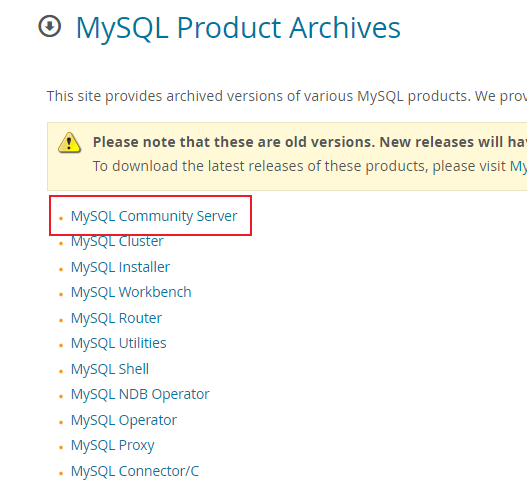
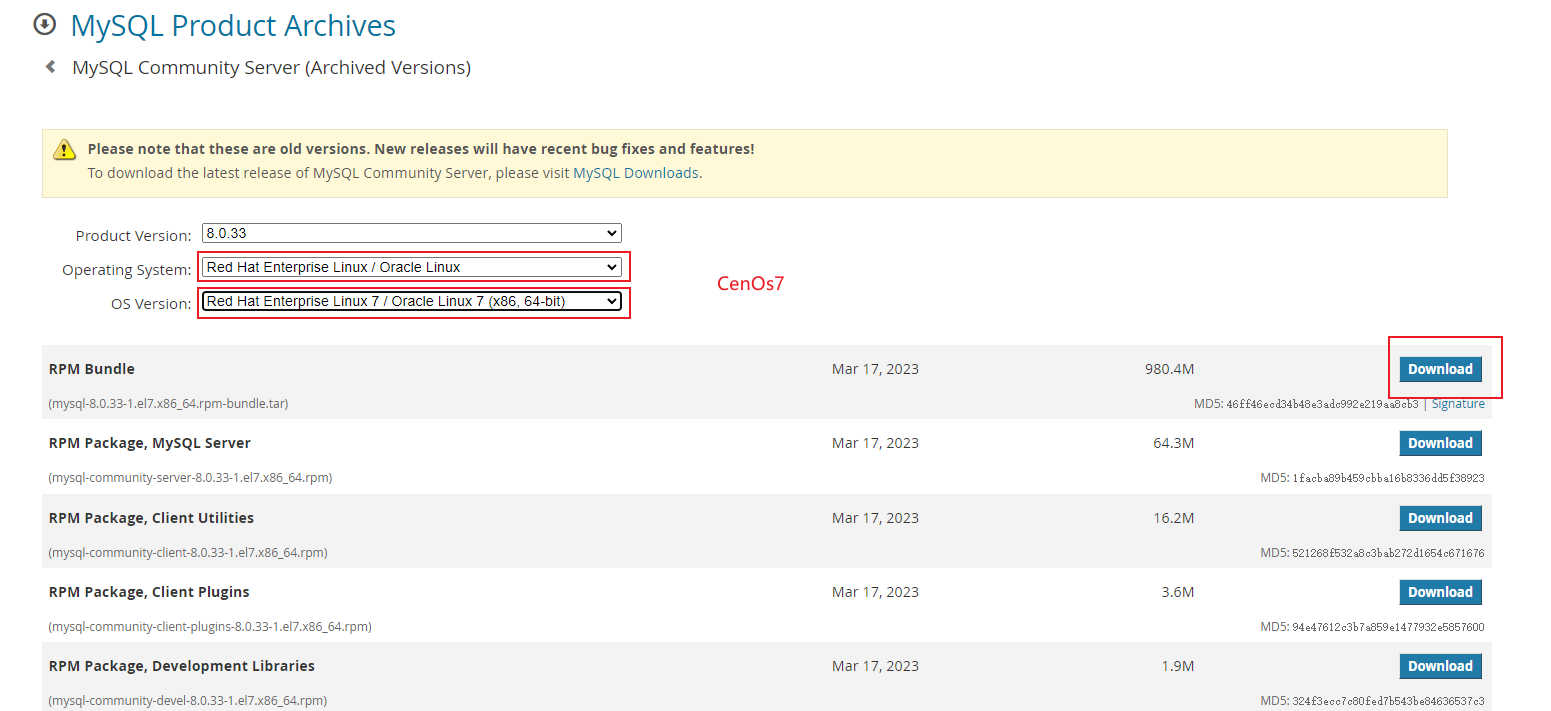
官网网址:MySQL :: MySQL Community Downloads

将文件解压到一个新建的文件夹中tar -xvf mysql-8.0.33-1.el7.x86_64.rpm-bundle.tar -C mysql-8.0.33

安装openssl-devel插件,mysql里有些rpm的安装依赖于该插件

安装rpm包

依次执行以下命令

1
2
3
4
5
6
7
8
9
10
11
12
13
14
15
16
# 共享的 MySQL 通用文件,可能包括一些共享的配置文件等。这是 MySQL 安装的一部分,通常需要安装
rpm -ivh mysql-community-common-8.0.33-1.el7.x86_64.rpm
# MySQL 客户端插件,提供额外的功能和扩展。具体需要哪些插件取决于你的使用情况。你可以根据你的需要来决定是否安装这些插件。
rpm -ivh mysql-community-client-plugins-8.0.33-1.el7.x86_64.rpm
# MySQL 库文件,用于在应用程序中连接到 MySQL 数据库。这是 MySQL 连接所必需的,通常需要安装
rpm -ivh mysql-community-libs-8.0.33-1.el7.x86_64.rpm
# 共享的 MySQL 通用文件,可能包括一些共享的配置文件等。这是 MySQL 安装的一部分,通常需要安装
rpm -ivh mysql-community-libs-compat-8.0.33-1.el7.x86_64.rpm
# MySQL 开发包,包含开发所需的头文件和库文件。如果你打算在该系统上开发与 MySQL 相关的应用程序,你需要安装此包
rpm -ivh mysql-community-devel-8.0.33-1.el7.x86_64.rpm
# MySQL 客户端工具,用于连接和管理 MySQL 服务器。通常情况下,如果你计划从该系统上远程连接到其他 MySQL 服务器,你需要安装此包。如果你的系统不需要连接其他 MySQL 服务器,则可能不需要安装
rpm -ivh mysql-community-client-8.0.33-1.el7.x86_64.rpm
# ICU 数据文件,用于支持国际化和字符集处理。如果你的应用程序不需要特定的国际化功能,则可能不需要安装
rpm -ivh mysql-community-icu-data-files-8.0.33-1.el7.x86_64.rpm
# MySQL 服务器,用于托管数据库实例。如果你计划在该系统上安装 MySQL 数据库服务器,你需要安装此包
rpm -ivh mysql-community-server-8.0.33-1.el7.x86_64.rpm

常用命令

启动

使用systemctl start mysqld命令启动服务器

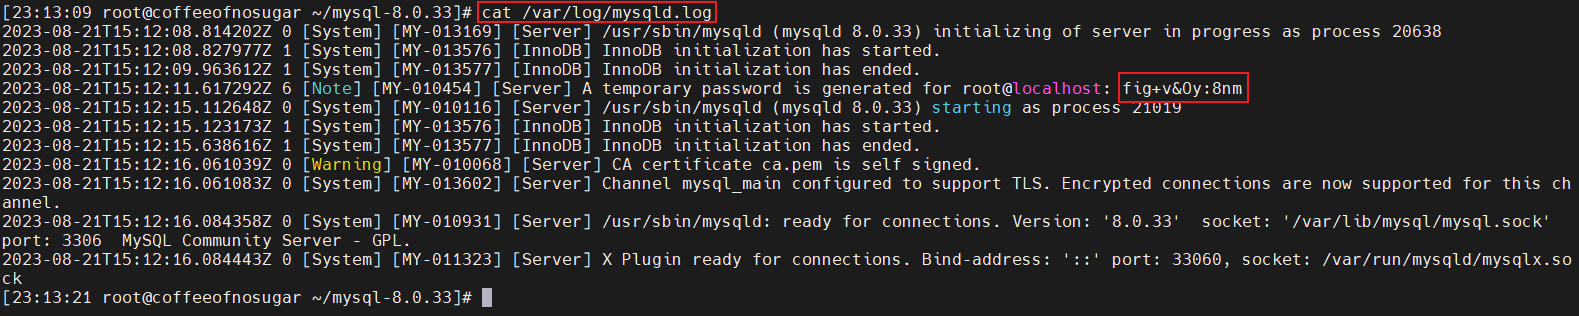
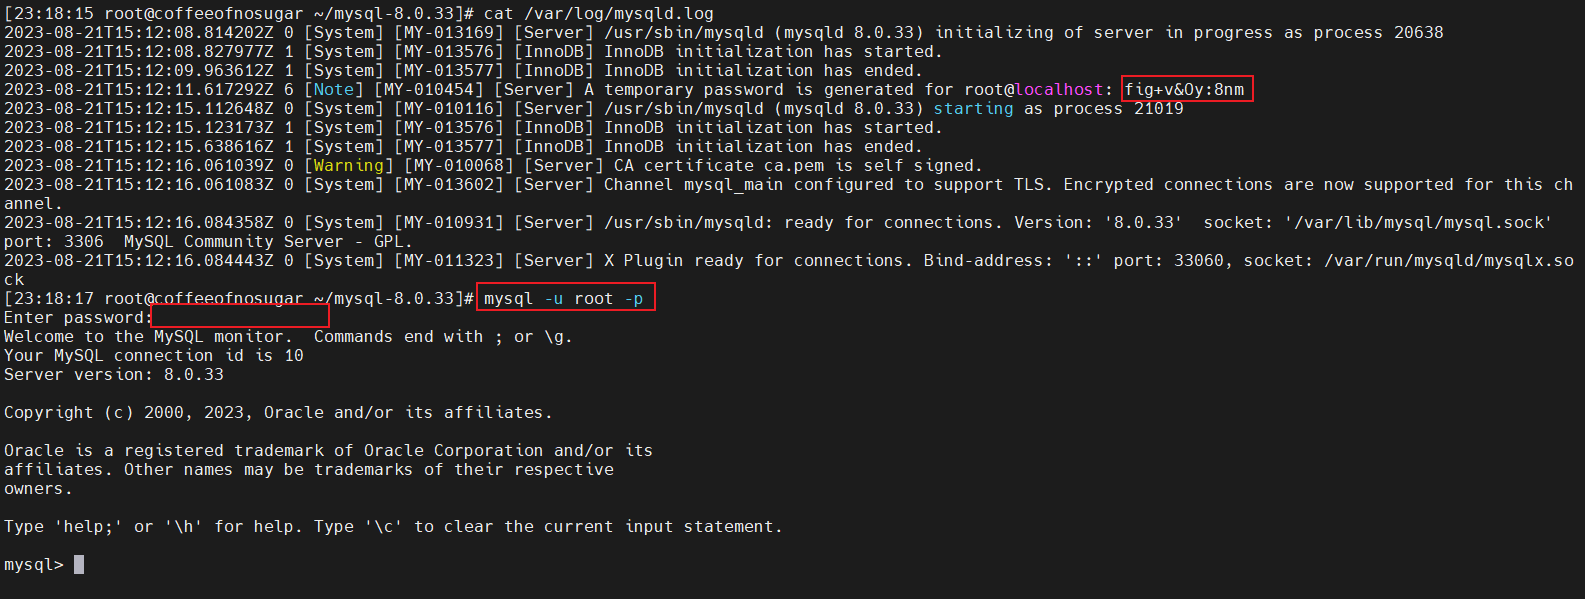
rpm安装MySQL会自动生成一个随机密码,可以在/var/log/mysqld.log中查看

使用mysql -u root -p进入客户端

设置密码

连接MySQL之后,使用ALTER USER 'root'@'localhost' IDENTIFIED BY '123456789';修改密码

出现Your password does not satisfy the current policy requirements提示,意思是您的密码不符合当前规定的要求,你要么就把你的密码设置得复杂点,要么就去降低密码的校验规则。

在 Linux 上安装 MySQL 时会自动安装一个校验密码的插件,默认密码检查策略要求密码必须包含:大小写字母、数字和特殊符号,并且长度不能少于8位。修改密码时新密码是否符合当前的策略,不满足则会提示ERROR

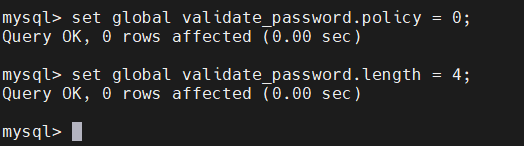
可以将这个限制密码位数设小一点,复杂度类型调底一点

1
2
3
4
# 将密码复杂度校验调整简单类型
set global validate_password.policy = 0;
# 设置密码最少位数限制为 4 位
set global validate_password.length = 4;

远程连接

可能遇到的问题

MySQL自身原因

MySQL默认不允许远程连接,修改配置

  1. 使用mysql -u root -p链接服务器
  2. show databases;查看当前所有数据库
  3. use mysql;进入mysql数据库(配置mysql的一个数据库)
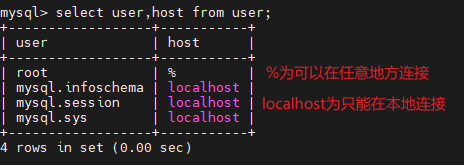
  4. select user,host from user;查看用户的链接方式
  1. 使用update user set host='%' where user='root';将root的链接方式修改为%
  2. systemctl restart mysqld重启mysql服务器

外在原因

  1. MySQL是否关掉了
  2. 防火墙的3306端口是否对外开放了
  3. 如果你是云服务器还需要开放3306的安全组
1
2
3
4
# 开放80端口,`--premanent`表示永久开放,重启后也依然开放
sudo firewall-cmd --zone=public --add-port=80/tcp --permanent
# 重新加载防火墙
firewall-cmd --reload

参考连接:Linux-安装MySQL(详细教程)

单例模式

懒汉模式:

指在第一次访问单例对象时才创建实例

特点是在多线程环境下可能会存在线程安全问题,因为多个线程可能在同一时间检查到实例不存在,从而导致多个实例被创建

1
2
3
4
5
6
7
8
9
10
11
12
13
14
15
16
17
18
19
20
21
public class UnitySingleton<T> : MonoBehaviour
where T : Component
{
private static T _instance;
public static T Instance
{
get
{
if (_instance == null)
{
_instance = FindObjectOfType(typeof(T)) as T;
if (_instance == null)
{
GameObject obj = new GameObject();
_instance = obj.AddComponent<T>();
}
}
return _instance;
}
}
}

饿汉模式:

指在类加载时就创建实例,无论是否需要

这样就可以避免多线程环境下的线程安全问题,但可能会增加启动时间和内存消耗

1
2
3
4
5
6
7
8
9
10
11
12
13
14
15
16
17
public class Singleton<T> : MonoBehaviour where T : MonoBehaviour, new()
{
public static T Instance = null;

public virtual void Awake()
{
if (Instance == null)
{
Instance = this as T;
}
else
{
Destroy(this.gameObject);
Debug.LogError("单例只允许存在一个,架构存在错误,本物体" + this.name + " 已删除");
}
}
}

拓展:

懒汉模式下,结束运行时可能会报错Some objects were not cleaned up when closing

这是因为我们在OnDestroy里访问了这个单例,结束运行时这个单例已经变成null

访问这个单例的时候又产生了一个新的实例才会报这个错误

可以将上述懒汉单例改成

1
2
3
4
5
6
7
8
9
10
11
12
13
14
15
16
17
18
19
20
21
22
23
24
25
26
27
28
29
public class UnitySingleton<T> : MonoBehaviour
where T : Component
{
private static bool applicationIsQuitting = false;
private static T _instance;
public static T Instance
{
get
{
if (_instance == null)
{
if (applicationIsQuitting)
return _instance;
_instance = FindObjectOfType(typeof(T)) as T;
if (_instance == null)
{
GameObject obj = new GameObject();
_instance = obj.AddComponent<T>();
}
}
return _instance;
}
}

protected virtual void OnDestory()
{
applicationIsQuitting = true;
}
}

观察者模式

使用委托和事件实现

下面的方法使用的是委托和列表的方式,原理是一样的

1
2
3
4
5
6
7
8
9
10
11
12
13
14
15
16
17
18
19
20
21
22
23
24
25
26
27
28
29
30
31
32
33
34
35
36
37
38
39
40
41
42
43
44
45
46
47
48
49
50
51
52
53
54
55
56
57
58
59
60
61
62
63
64
65
66
using System.Collections;
using System.Collections.Generic;
using UnityEngine;

public class EventManager : Singleton<EventManager>
{
public delegate void EventCallBack(object param);// 事件回调函数
// 事件字典,键可以用枚举来实现
Dictionary<int, List<EventCallBack>> mDictEvent = new Dictionary<int, List<EventCallBack>>();

/// <summary>
/// 添加事件监听
/// </summary>
public void AddEvent(int eventId, EventCallBack callBack)
{
if(!mDictEvent.ContainsKey(eventId))
{
mDictEvent.Add(eventId,new List<EventCallBack>());
}
if(!mDictEvent[eventId].Contains(callBack))
{
mDictEvent[eventId].Add(callBack);
}
else
{
Debug.LogWarning("Repeat Add Event CallBack,EventId = " + eventId + ",CallBack = " + callBack.ToString());
}
}

/// <summary>
/// 删除事件监听
/// </summary>
public void DelEvent(int eventId, EventCallBack callBack)
{
if(!mDictEvent.ContainsKey(eventId))
{
return;
}
if(!mDictEvent[eventId].Contains(callBack))
{
return;
}
mDictEvent[eventId].Remove(callBack);

// 如果回调都被移除了 那么key也从字典移除
if (mDictEvent[eventId].Count < 1)
{
mDictEvent.Remove(eventId);
}

}

/// <summary>
/// 通知事件
/// </summary>
public void NotifyEvent(int eventId,object param)
{
if(mDictEvent.ContainsKey(eventId))
{
foreach(var callback in mDictEvent[eventId])
{
callback(param);
}
}
}
}

组合模式

把公共方法抽象成组件,需要用到这个方法的对象可以将对应的组件添加到该对象上

比较简单,就不举例了


命令模式

适用场景:实现撤销功能

大致由三部分组成:命令类、命令管理器类、输入类

命令类:

1
2
3
4
5
6
7
8
9
10
11
12
13
14
15
16
17
18
19
20
21
22
23
24
25
26
27
28
29
30
31
32
33
34
35
36
37
38
39
40
41
42
43
44
45
46
47
48
49
50
51
52
53
54
using UnityEngine;

/// <summary>
/// 命令基类
/// </summary>
public abstract class CommandBase
{
/// <summary>
/// 执行
/// </summary>
public abstract void Execute();

/// <summary>
/// 撤销
/// </summary>
public abstract void Undo();
}

public class MoveForWard : CommandBase
{
private GameObject _player;
public MoveForWard(GameObject player)
{
_player = player;
}

public override void Execute()
{
_player.transform.Translate(Vector3.forward);
}

public override void Undo()
{
_player.transform.Translate(Vector3.back);
}
}

public class MoveLeft : CommandBase
{
private GameObject _player;
public MoveLeft(GameObject player)
{
_player = player;
}
public override void Execute()
{
_player.transform.Translate(Vector3.left);
}

public override void Undo()
{
_player.transform.Translate(Vector3.right);
}
}

命令管理器类:

1
2
3
4
5
6
7
8
9
10
11
12
13
14
15
16
17
18
19
20
21
22
23
24
25
26
27
28
29
30
31
32
using System.Collections;
using System.Collections.Generic;
using UnityEngine;

public class CommandManager : MonoBehaviour
{
public static CommandManager Instance;
private readonly List<CommandBase> _commandList = new List<CommandBase>();

private void Awake()
{
if (Instance) Destroy(Instance);
else Instance = this;
}

public void AddCommands(CommandBase command)
{
_commandList.Add(command);
}

public IEnumerator UndoStart()
{
_commandList.Reverse();
foreach (CommandBase command in _commandList)
{
yield return new WaitForSeconds(.2f);
command.Undo();
}

_commandList.Clear();
}
}

输入类:

监听按键点击,只负责接受输入,具体的操作放在命令的Execute方法中,这样实现解耦
点击W或A键时执行命令,并把命令添加的管理器的列表中,点击B键撤销之前所有的命令

1
2
3
4
5
6
7
8
9
10
11
12
13
14
15
16
17
18
19
20
21
22
23
24
25
26
27
28
29
30
31
32
33
34
35
using UnityEngine;

public class InputHandler : MonoBehaviour
{
private MoveForWard _moveForward;
private MoveLeft _moveLeft;
private GameObject _playerCube;

private void Start()
{
_playerCube = GameObject.CreatePrimitive(PrimitiveType.Cube);
}

private void Update()
{
if (Input.GetKeyDown(KeyCode.W))
{
_moveForward = new MoveForWard(_playerCube);
_moveForward.Execute();
CommandManager.Instance.AddCommands(_moveForward);//顺序不能弄混,因为要等赋值完后再加入
}

if (Input.GetKeyDown(KeyCode.A))
{
_moveLeft = new MoveLeft(_playerCube);
_moveLeft.Execute();
CommandManager.Instance.AddCommands(_moveLeft);
}

if (Input.GetKeyDown(KeyCode.B))
{
StartCoroutine(CommandManager.Instance.UndoStart());
}
}
}

状态模式

一般使用有限状态机实现

  • 将对象的行为抽象成几个独立的状态
  • 某一时刻只能处于其中一种状态
  • 通过管理控制状态的互相切换

有两张使用场景:场景切换、怪物AI

核心代码(状态机):

1
2
3
4
5
6
7
8
9
10
11
12
13
14
15
16
17
18
19
20
21
22
23
24
25
26
27
28
29
30
31
32
33
34
35
36
37
38
39
40
41
42
43
44
45
46
47
48
49
50
51
52
53
54
55
56
57
58
59
60
61
62
63
64
65
66
67
68
69
70
71
72
73
74
75
76
77
78
79
80
81
82
83
84
85
using System.Collections.Generic;
using UnityEngine;
using System;

namespace MY_FSM
{
public enum StateType
{
Idle,
MOVE,
Find_Enemy,
Attack,
Die,
Success,
}

/// 接口,AI的状态需要接收这个接口
public interface IState
{
void OnEnter();
void OnExit();
void OnUpdate();
// void OnCheck();
// void OnFixUpdate();
}

[Serializable]
public class Blackboard
{
// 此处存储共享数据,或者向外展示的数据,可配置的数据
}

public class FSM
{
public IState curState;
public Dictionary<StateType, IState> states;
public Blackboard blackboard;

public FSM(Blackboard blackboard)
{
this.states = new Dictionary<StateType, IState>();
this.blackboard = blackboard;
}

public void AddState(StateType stateType, IState state)
{
if (states.ContainsKey(stateType))
{
Debug.Log("[AddState] >>>>>>>>>>>>> map has contain key: " + stateType);
return;
}
states.Add(stateType, state);
}

public void SwitchState(StateType stateType)
{
if (!states.ContainsKey(stateType))
{
Debug.Log("[SwitchState] >>>>>>>>>>>>>>>>> not contain key: " + stateType);
return;
}
if (curState != null)
{
curState.OnExit();
}
curState = states[stateType];
curState.OnEnter();
}

public void OnUpdate()
{
curState.OnUpdate();
}

public void OnFixUpdate()
{
// curState.OnFixUpdate();
}

public void OnCheck()
{
// curState.OnCheck();
}
}
}

装饰器

装饰器可以灵活的控制两个函数的执行顺序

无返回值

1
2
3
4
5
6
7
8
def sum(func):
print(1)
func()
print(3)

@sum
def take():
print(2)

输出结果

1
2
3
1
2
3

有返回值

1
2
3
4
5
6
7
8
9
10
11
12
13
14
15
16
def outer(func):
print("outer") # ----------1
def wrapper(x, y): # ----------3
print("wrapper") # ----------4
res = func(x, y) # ----------5
return res # ----------9
return wrapper # ----------2


@outer
def inner(x, y): # ----------6
print("inner") # ----------7
return x+y # ----------8


print(inner(1,2))

输出结果

1
2
3
4
outer
wrapper
inner
3

上下文管理器

在 Python 中,上下文管理器常常与 with 语句一起使用。with 语句会在代码块进入时调用上下文管理器的 __enter__() 方法,而在代码块退出时会调用上下文管理器的 __exit__() 方法。这种机制确保了资源在适当的时候被初始化和清理。

最基础的上下管理器:

1
2
with open("a.txt", 'r') as file:
file.read()

自己定义一个上下文管理器

1
2
3
4
5
6
7
8
9
10
11
12
13
14
15
16
17
18
19
20
21
class MyContext:
def __enter__(self):
print("Entering the context")
return self

def __exit__(self, exc_type, exc_value, traceback):
"""
exc_type: 异常类型,如果没有异常则为None
exc_value: 异常值,如果没有异常则为None
traceback: 追溯信息,如果没有异常则为None
"""
print("Exiting the context")
if exc_type is not None:
print(f"An exception of type {exc_type} occurred with value {exc_value}")
return False # Return True if you want to suppress the exception

# 使用with语句创建上下文管理器
with MyContext() as context:
print("Inside the context")

print("Outside the context")

输出

1
2
3
4
Entering the context
Inside the context
Exiting the context
Outside the context

contextlib模块

基础用法

上面我们自定义上下文管理器确实很方便,但是Python标准库还提供了更加易用的上下文管理器工具模块contextlib,它是通过生成器实现的,我们不需要再创建类以及__enter____exit__这两个特俗的方法:

1
2
3
4
5
6
7
8
9
10
11
12
from contextlib import contextmanager

@contextmanager
def make_open_context(filename, mode):
fp = open(filename, mode)
try:
yield fp
finally:
fp.close()

with make_open_context('/tmp/a.txt', 'a') as file_obj:
file_obj.write("hello carson666")

在上文中,yield关键词把上下文分割成两部分:

  • yiled之前就是__enter__中的代码块
  • yield之后就是__exit__中的代码块

yeild生成的值会绑定到with语句的as子句中的变量。例如上面的例子中yield生成的值是文件句柄对象fp,在下面的with语句中,会将fpfile_obj绑定到一起,也就是说file_obj此时就是一个文件句柄对象,那么它就可以操作文件了,因此就可以调用file_obj.write("hello world")

另外要注意的是,如果yield没有生成值,那么在with语句中就不需要写as子句了

将普通的类变为上下文管理器类

1
2
3
4
5
6
7
8
9
10
11
12
13
14
from contextlib import contextmanager

class MyResource:
def query(self):
print("query data")

@contextmanager
def make_myresource():
print("connect to resource")
yield MyResource()
print("connect to resource")

with make_myresource() as r:
r.query()

输出

1
2
3
connect to resource
quert data
connect to resource

Union

作用:限制数据类型的范围

1
2
3
4
5
6
7
8
9
from typing import Union

def give_me_the_bigger_one(num0: Union[int, float], num1: Union[int, float]) -> Union[int, float]:
if type(num0) != type(num1):
raise ValueError(f"The two number {num0} and {num1} must have the same type!")
if num0 > num1:
return num0
else:
return num1

a: Union[int, float]表示变量a可以是int,也可以是float

扩展:
Any可以表示任意类型,如果写成a: Any那么就相当于没有做任何事,因为如果只写a的话本身就是能代指任意类型

TypeVar

制作模板——自己定义一个类型

1
2
3
4
5
6
7
8
9
10
11
12
13
14
from typing import TypeVar


T = TypeVar("T")


def give_me_the_bigger_one(num0: T, num1: T) -> T:
if type(num0) != type(num1):
raise ValueError(f"The two number {num0} and {num1} must have the same type!")

if num0 > num1:
return num0
else:
return num1

T = TypeVar("T")表示定义了一个泛型类型变量T,并没有指定他的类型上限,也就是说传给这个函数的参数可以是任意类型

通常在创建泛型类变量时会使用bound参数指定上限:

1
2
3
4
5
6
7
8
from typing import TypeVar

# 定义了一个泛型类型变量T_Config,他的类上限是BasePluginConfig
# 意味着T_Config可以被替代为BasePluginConfig类型或BasePluginConfig的子类
T_Config = TypeVar("T_Config", bound=BasePluginConfig)

class BasePluginConfig():
pass

Generic

类似于where,限制传给一个函数的类型范围

1
2
3
4
5
6
7
8
9
10
11
12
13
14
15
16
17
18
19
20
21
22
23
24
from typing import List, TypeVar, Generic

T = TypeVar('T')

class Queue(Generic[T]):
def __init__(self) -> None:
# 定义一个元素类型都是T的队列
self.items: List[T] = []

def push(self, item: T) -> None:
self.items.append(item)

def pop(self) -> T:
return self.items.pop(0)

def __str__(self):
return str(self.items)

q = Queue[int]()
q.push(0)
q.push(1)
q.pop() # 移除0
q.push('string') # 并不会报错
print(q)

输出

1
2
3
[1, 'string']

进程已结束,退出代码0

注意最后的q.push('string')'string'虽然并不是int类型,但是在实际运行中并不会报错,不过我们可以通过使用静态类型检查工具(mypy, pytype, pyright, pyre)等方法,提前发现这些错误。这也是推荐使用typing模块来做type annotation的理由之一。

总结

  • 使用typing模块盒注释来提高代码的可读性

  • 将自动化的类型检查工具和API生成工具部署在CI中,方便提前发现错误,方便新人员的理解

参考:

Python中的泛型

委托

委托可以把一个方法代入另一个方法,相当于指向函数的指针,换句话说,委托相当于一个函数指针

总的来说,委托是一个类,该类内部维护着一个字段,指向一个方法。

委托的声明:public delegate void DoDelegate();

1
2
3
4
5
6
7
8
9
10
11
12
13
14
15
16
17
// 测试方法
void Test(object sender, EventArgs e)
{
Console.Write($"valueStr={sender}");
}
// 定义委托
public delegate void DoDelegate(object sender, EventArgs e);

// 实例化委托——只是实例化,并不会执行
DoDelegate doDelegate = new DoDelegate(Test);
object sender = 888;
EventArgs e = new EventArgs(); // EventArgs是自定义事件,这里想要表达的意思是委托的参数不单只能是数值,还能是事件
// 执行委托的两种方法
// 方法一:
doDelegate?.Invoke(sender, e);
// 方法二:
doDelegate(sender, e);

泛型委托

我们每次要使用一个委托时,都需要先声明这个委托类,规定参数和返回值类型,然后才能实例化、调用。为了简化这个过程, .NET 框架为我们封装了三个泛型委托类,因此大部分情况下我们不必再声明委托,可以拿来直接实例化使用,方便了我们的日常写代码。
这三种泛型委托包括:Func委托、Action委托和Predicate委托。

Func委托

Func委托代表着拥有返回值的泛型委托。Func有一系列的重载,形式如 Func<T1,T2, … TResult>,其中TResult代表委托的返回值类型,其余均是参数类型。只有一个T时,即Func,代表该委托是无参数的。.NET封装了最多16个输入参数的Funct<>委托。
需要特别注意的是,若方法没有返回值,即返回 void ,由于 void 不是数据类型,因此不能定义Func委托。返回 void 的泛型委托见下文的Action。
Func的使用方法与一般的委托相同。例如上面的案例可改写如下:

1
2
3
4
5
6
7
8
9
10
11
12
13
14
15
16
17
18
19
20
namespace delegateTest
{
class Program
{
static void Main(string[] args)
{
int calNum = Calculate(1, 2, Sub);
Console.WriteLine("calNum:{0}", calNum);// -1
}
static int Calculate(int num1, int num2, Func<int, int, int> calDel)
{
return calDel(num1,num2);
}
static int Sub(int num1, int num2)
{
Console.WriteLine("num1 - num2={0}", num1 - num2);
return num1 - num2;
}
}
}
Action委托

Action委托代表返回值为空 void 的委托,它也有一些列重载,最多拥有16个输入参数。用法与Func相同。

1
2
3
4
5
6
7
8
9
10
11
12
13
14
15
16
17
18
namespace delegateTest
{
class Program
{
static void Main(string[] args)
{
DoSome("hello",Say);// hello
}
static void DoSome(string str,Action<string> doAction)
{
doAction(str);
}
static void Say(string str)
{
Console.WriteLine(str);
}
}
}
Predicate委托

这个一般用的比较少,它封装返回值为bool类型的委托,可被Func代替。

匿名委托

采用匿名方法实例化的委托称为匿名委托。
每次实例化一个委托时,都需要事先定义一个委托所要调用的方法。为了简化这个流程,C# 2.0开始提供匿名方法来实例化委托。这样,我们在实例化委托时就可以 “随用随写” 它的实例方法。
使用的格式是:

委托类名 委托实例名= delegate(args) { 方法体代码 };

这样就可以直接把方法写在实例化代码中,不必在另一个地方定义方法。当然,匿名委托不适合需要采用多个方法的委托的定义。

使用匿名方法可以将最初的代码改写为:

1
2
3
4
5
6
7
8
9
10
11
public delegate void DoDelegate(object sender, EventArgs e);

DoDelegate doDelegate = delegate(sender, e)
{
Console.Write($"valueStr={sender}");
};

object sender = 888;
EventArgs e = new EventArgs(); // EventArgs是自定义事件,这里想要表达的意思是委托的参数不单只能是数值,还能是事件

doDelegate(sender, e); // 执行

Lambda表达式

纵然匿名方法使用很方便,可惜她很快就成了过气网红,没能领多长时间的风骚。如今已经很少见到了,因为delegate关键字限制了她用途的扩展。自从C# 3.0开始,她就被Lambda表达式取代,而且Lambda表达式用起来更简单。Lambda表达式本质上是改进的匿名方法。

表达式Lambda

当匿名函数只有一行代码时,可以采用这种形式:

1
2
3
4
5
6
7
8
public delegate void DoDelegate(object sender, EventArgs e);

DoDelegate doDelegate = (sender, e) => Console.Write($"valueStr={sender}");

object sender = 888;
EventArgs e = new EventArgs(); // EventArgs是自定义事件,这里想要表达的意思是委托的参数不单只能是数值,还能是事件

doDelegate(sender, e); // 执行
语句Lambda

当匿名函数有多行代码时,只能采用语句Lambda

1
2
3
4
5
6
7
8
9
10
11
12
public delegate void DoDelegate(object sender, EventArgs e);

DoDelegate doDelegate = (sender, e) => {
Console.WriteLine(System.Reflection.MethodBase.GetCurrentMethod().Name); // 打印当前方法的名称
Console.Write($"valueStr={sender}");
return;
};

object sender = 888;
EventArgs e = new EventArgs(); // EventArgs是自定义事件,这里想要表达的意思是委托的参数不单只能是数值,还能是事件

doDelegate(sender, e); // 执行

语句Lambda不能省略return。


事件

事件相当于保存委托的数组

事件是基于委托的,为委托提供一个订阅或发布的机制。事件是一种特殊的委托,调用事件和委托是一样的。

事件可以被看作是委托类型的一个变量,通过事件注册、取消多个委托和方法。

public event 委托类型 事件名称;
如:public event DoDelegate DoEvent;

1
2
3
4
5
6
7
8
9
10
11
12
13
14
15
16
17
18
19
20
21
22
23
24
25
26
// 测试方法
void Test(object sender, EventArgs e)
{
Console.Write($"valueStr={sender}");
}
// 定义委托
public delegate void DoDelegate(object sender, EventArgs e);
// 定义事件
public event DODelegate DoEvent;

object sender = 888;
EventArgs e = new EventArgs();
// 两种用法
// 1.给事件注册委托
// 2.给事件直接注册方法
// 用法一(给事件注册委托):
// 给事件注册委托,可注册多个委托
DoEvent += new DoDelegate(doDelegate);
// 执行事件内所有的委托
DoEvent(sender, e);

// 用法二(给事件注册方法):
// 给事件注册方法,可注册多个方法
DoEvent += Test;
// 执行事件内所有的方法
DoEvent(sender, e);

忽略已跟踪的文件

.gitignore文件只能忽略未跟踪状态的文件,如果已经被跟踪了,可以使用下面的两种方法

git rm –cached <file>

彻底忽略该文件,push后,远程也将忽略该文件

如果远程仓库已经有了logs文件夹,使用三步完成

  1. 使用命令删除文件的跟踪状态 git rm --cached logs/
  2. 此时本地工作区修改还在,需要更新一下/gitignore文件
  3. 最后使用命令删除远程仓库对应的文件git add . && git commit -m "xx" && git push

skip-worktree和assume-unchanged

只在自己的工作区内忽略文件

skip-worktree

skip-worktree可以实现修改本地文件不会被提交,但又可以拉取最新更改需求。适用于一些不经常变动,但是必须本地化设置的文件

1
2
3
4
5
6
// 添加忽略文件
git update-index --skip-worktree <file>
// 取消忽略
git update-index --no-skip-worktree <file>
// 查看skip-worktree列表
git ls-files -v | grep '^S\'

assume-unchanged

该命令只是假设文件没有发生变动,使用reset时会将文件修改回去。当远程仓库相应的文件被修改时,pull更新之后,–assume-unchanged会被清楚

1
2
3
4
5
6
// 添加忽略文件
git update-index --assume-unchanged <file>
// 取消忽略
git update-index --no-assume-unchanged <file>
// 查看忽略了哪些文件
git ls-files -v | grep '^h\'

参考

一文带你彻底搞懂Git!


.gitignore文件

在此记录一下各个项目的.gitignore文件内容

https://github.com/github/gitignore/blob/main/Unity.gitignore

python

1
2
3
4
5
6
7
8
9
10
11
12
13
14
15
16
17
18
19
20
21
22
23
24
25
26
27
28
29
30
31
32
33
34
35
36
37
38
39
40
41
42
43
44
45
46
47
48
49
50
51
52
53
54
55
56
57
58
59
60
61
62
63
64
65
66
67
68
69
70
71
72
73
74
75
76
77
78
79
80
81
82
83
84
85
86
87
88
89
90
91
92
93
94
95
96
97
98
99
100
101
102
103
104
105
106
107
108
109
110
111
112
113
114
115
116
117
118
119
120
121
122
123
124
125
126
127
128
129
130
131
132
133
134
135
136
137
138
139
140
141
142
143
144
145
146
147
148
149
150
151
152
153
154
155
156
157
158
159
160
# Byte-compiled / optimized / DLL files
__pycache__/
*.py[cod]
*$py.class

# C extensions
*.so

# Distribution / packaging
.Python
build/
develop-eggs/
dist/
downloads/
eggs/
.eggs/
lib/
lib64/
parts/
sdist/
var/
wheels/
share/python-wheels/
*.egg-info/
.installed.cfg
*.egg
MANIFEST

# PyInstaller
# Usually these files are written by a python script from a template
# before PyInstaller builds the exe, so as to inject date/other infos into it.
*.manifest
*.spec

# Installer logs
pip-log.txt
pip-delete-this-directory.txt

# Unit test / coverage reports
htmlcov/
.tox/
.nox/
.coverage
.coverage.*
.cache
nosetests.xml
coverage.xml
*.cover
*.py,cover
.hypothesis/
.pytest_cache/
cover/

# Translations
*.mo
*.pot

# Django stuff:
*.log
local_settings.py
db.sqlite3
db.sqlite3-journal

# Flask stuff:
instance/
.webassets-cache

# Scrapy stuff:
.scrapy

# Sphinx documentation
docs/_build/

# PyBuilder
.pybuilder/
target/

# Jupyter Notebook
.ipynb_checkpoints

# IPython
profile_default/
ipython_config.py

# pyenv
# For a library or package, you might want to ignore these files since the code is
# intended to run in multiple environments; otherwise, check them in:
# .python-version

# pipenv
# According to pypa/pipenv#598, it is recommended to include Pipfile.lock in version control.
# However, in case of collaboration, if having platform-specific dependencies or dependencies
# having no cross-platform support, pipenv may install dependencies that don't work, or not
# install all needed dependencies.
#Pipfile.lock

# poetry
# Similar to Pipfile.lock, it is generally recommended to include poetry.lock in version control.
# This is especially recommended for binary packages to ensure reproducibility, and is more
# commonly ignored for libraries.
# https://python-poetry.org/docs/basic-usage/#commit-your-poetrylock-file-to-version-control
#poetry.lock

# pdm
# Similar to Pipfile.lock, it is generally recommended to include pdm.lock in version control.
#pdm.lock
# pdm stores project-wide configurations in .pdm.toml, but it is recommended to not include it
# in version control.
# https://pdm.fming.dev/#use-with-ide
.pdm.toml

# PEP 582; used by e.g. github.com/David-OConnor/pyflow and github.com/pdm-project/pdm
__pypackages__/

# Celery stuff
celerybeat-schedule
celerybeat.pid

# SageMath parsed files
*.sage.py

# Environments
.env
.venv
env/
venv/
ENV/
env.bak/
venv.bak/

# Spyder project settings
.spyderproject
.spyproject

# Rope project settings
.ropeproject

# mkdocs documentation
/site

# mypy
.mypy_cache/
.dmypy.json
dmypy.json

# Pyre type checker
.pyre/

# pytype static type analyzer
.pytype/

# Cython debug symbols
cython_debug/

# PyCharm
# JetBrains specific template is maintained in a separate JetBrains.gitignore that can
# be found at https://github.com/github/gitignore/blob/main/Global/JetBrains.gitignore
# and can be added to the global gitignore or merged into this file. For a more nuclear
# option (not recommended) you can uncomment the following to ignore the entire idea folder.
#.idea/

Unity

项目中大量自动生成的*.meta文件是需要加入版本管理的

这个文件包含的信息:

  • 描述如何导入这个资产文件
  • 如何在项目中准备资产

根目录下的sln和csproj文件是为了能更好的使用Visual Studio,实际上Unity是用不上这个的,也是可以忽略掉的

1
2
3
4
5
6
7
8
9
10
11
12
13
14
15
16
17
18
19
20
21
22
23
24
25
26
27
28
29
30
31
32
33
34
35
36
37
38
39
40
41
42
43
44
45
46
47
48
49
50
51
52
53
54
55
56
57
58
59
60
61
62
63
64
65
66
67
68
69
70
71
# This .gitignore file should be placed at the root of your Unity project directory
#
# Get latest from https://github.com/github/gitignore/blob/master/Unity.gitignore
#
/[Ll]ibrary/
/[Tt]emp/
/[Oo]bj/
/[Bb]uild/
/[Bb]uilds/
/[Ll]ogs/
/[Uu]ser[Ss]ettings/

# MemoryCaptures can get excessive in size.
# They also could contain extremely sensitive data
/[Mm]emoryCaptures/

# Asset meta data should only be ignored when the corresponding asset is also ignored
!/[Aa]ssets/**/*.meta

# Uncomment this line if you wish to ignore the asset store tools plugin
# /[Aa]ssets/AssetStoreTools*

# Autogenerated Jetbrains Rider plugin
/[Aa]ssets/Plugins/Editor/JetBrains*

# Visual Studio cache directory
.vs/

# Gradle cache directory
.gradle/

# Autogenerated VS/MD/Consulo solution and project files
ExportedObj/
.consulo/
*.csproj
*.unityproj
*.sln
*.suo
*.tmp
*.user
*.userprefs
*.pidb
*.booproj
*.svd
*.pdb
*.mdb
*.opendb
*.VC.db

# Unity3D generated meta files
*.pidb.meta
*.pdb.meta
*.mdb.meta

# Unity3D generated file on crash reports
sysinfo.txt

# Builds
*.apk
*.unitypackage

# Crashlytics generated file
crashlytics-build.properties

# Packed Addressables
/[Aa]ssets/[Aa]ddressable[Aa]ssets[Dd]ata/*/*.bin*

# Temporary auto-generated Android Assets
/[Aa]ssets/[Ss]treamingAssets/aa.meta
/[Aa]ssets/[Ss]treamingAssets/aa/*

vs的C#项目

1
2
3
4
5
6
7
8
9
10
11
12
13
14
15
16
17
18
19
20
21
22
23
24
25
26
27
28
29
30
31
32
33
34
35
36
37
38
39
40
41
42
43
44
45
46
47
48
49
50
51
52
53
54
55
56
57
58
59
60
61
62
63
64
65
66
67
68
69
70
71
72
73
74
75
76
77
78
79
80
81
82
83
84
85
86
87
88
89
90
91
92
93
94
95
96
97
98
99
100
101
102
103
104
105
106
107
108
109
110
111
112
113
114
115
116
117
118
119
120
121
122
123
124
125
126
127
128
129
130
131
132
133
134
135
136
137
138
139
140
141
142
143
144
145
146
147
148
149
150
151
152
153
154
155
156
157
158
159
160
161
162
163
164
165
166
167
168
169
170
171
172
173
174
175
176
177
178
179
180
181
182
183
184
185
186
187
188
189
190
191
192
193
194
195
196
197
198
199
200
201
202
203
204
205
206
207
208
209
210
211
212
213
214
215
216
217
218
219
220
221
222
223
224
225
226
227
228
229
230
231
232
233
234
235
236
237
238
239
240
241
242
243
244
245
246
247
248
249
250
251
252
253
254
255
256
257
258
259
260
261
262
263
264
265
266
267
268
269
270
271
272
273
274
275
276
277
278
279
280
281
282
283
284
285
286
287
288
289
290
291
292
293
294
295
296
297
298
299
300
301
302
303
304
305
306
307
308
309
310
311
312
313
314
315
316
317
318
319
320
321
322
323
324
325
326
327
328
329
330
331
332
333
334
335
336
337
338
339
340
341
342
343
344
345
346
347
348
349
350
351
352
353
354
355
356
357
358
359
360
361
362
## Ignore Visual Studio temporary files, build results, and
## files generated by popular Visual Studio add-ons.
##
## Get latest from https://github.com/github/gitignore/blob/master/VisualStudio.gitignore

# User-specific files
*.rsuser
*.suo
*.user
*.userosscache
*.sln.docstates

# User-specific files (MonoDevelop/Xamarin Studio)
*.userprefs

# Mono auto generated files
mono_crash.*

# Build results
[Dd]ebug/
[Dd]ebugPublic/
[Rr]elease/
[Rr]eleases/
x64/
x86/
[Ww][Ii][Nn]32/
[Aa][Rr][Mm]/
[Aa][Rr][Mm]64/
bld/
[Bb]in/
[Oo]bj/
[Ll]og/
[Ll]ogs/

# Visual Studio 2015/2017 cache/options directory
.vs/
# Uncomment if you have tasks that create the project's static files in wwwroot
#wwwroot/

# Visual Studio 2017 auto generated files
Generated Files/

# MSTest test Results
[Tt]est[Rr]esult*/
[Bb]uild[Ll]og.*

# NUnit
*.VisualState.xml
TestResult.xml
nunit-*.xml

# Build Results of an ATL Project
[Dd]ebugPS/
[Rr]eleasePS/
dlldata.c

# Benchmark Results
BenchmarkDotNet.Artifacts/

# .NET Core
project.lock.json
project.fragment.lock.json
artifacts/

# ASP.NET Scaffolding
ScaffoldingReadMe.txt

# StyleCop
StyleCopReport.xml

# Files built by Visual Studio
*_i.c
*_p.c
*_h.h
*.ilk
*.meta
*.obj
*.iobj
*.pch
*.pdb
*.ipdb
*.pgc
*.pgd
*.rsp
*.sbr
*.tlb
*.tli
*.tlh
*.tmp
*.tmp_proj
*_wpftmp.csproj
*.log
*.vspscc
*.vssscc
.builds
*.pidb
*.svclog
*.scc

# Chutzpah Test files
_Chutzpah*

# Visual C++ cache files
ipch/
*.aps
*.ncb
*.opendb
*.opensdf
*.sdf
*.cachefile
*.VC.db
*.VC.VC.opendb

# Visual Studio profiler
*.psess
*.vsp
*.vspx
*.sap

# Visual Studio Trace Files
*.e2e

# TFS 2012 Local Workspace
$tf/

# Guidance Automation Toolkit
*.gpState

# ReSharper is a .NET coding add-in
_ReSharper*/
*.[Rr]e[Ss]harper
*.DotSettings.user

# TeamCity is a build add-in
_TeamCity*

# DotCover is a Code Coverage Tool
*.dotCover

# AxoCover is a Code Coverage Tool
.axoCover/*
!.axoCover/settings.json

# Coverlet is a free, cross platform Code Coverage Tool
coverage*.json
coverage*.xml
coverage*.info

# Visual Studio code coverage results
*.coverage
*.coveragexml

# NCrunch
_NCrunch_*
.*crunch*.local.xml
nCrunchTemp_*

# MightyMoose
*.mm.*
AutoTest.Net/

# Web workbench (sass)
.sass-cache/

# Installshield output folder
[Ee]xpress/

# DocProject is a documentation generator add-in
DocProject/buildhelp/
DocProject/Help/*.HxT
DocProject/Help/*.HxC
DocProject/Help/*.hhc
DocProject/Help/*.hhk
DocProject/Help/*.hhp
DocProject/Help/Html2
DocProject/Help/html

# Click-Once directory
publish/

# Publish Web Output
*.[Pp]ublish.xml
*.azurePubxml
# Note: Comment the next line if you want to checkin your web deploy settings,
# but database connection strings (with potential passwords) will be unencrypted
*.pubxml
*.publishproj

# Microsoft Azure Web App publish settings. Comment the next line if you want to
# checkin your Azure Web App publish settings, but sensitive information contained
# in these scripts will be unencrypted
PublishScripts/

# NuGet Packages
*.nupkg
# NuGet Symbol Packages
*.snupkg
# The packages folder can be ignored because of Package Restore
**/[Pp]ackages/*
# except build/, which is used as an MSBuild target.
!**/[Pp]ackages/build/
# Uncomment if necessary however generally it will be regenerated when needed
#!**/[Pp]ackages/repositories.config
# NuGet v3's project.json files produces more ignorable files
*.nuget.props
*.nuget.targets

# Microsoft Azure Build Output
csx/
*.build.csdef

# Microsoft Azure Emulator
ecf/
rcf/

# Windows Store app package directories and files
AppPackages/
BundleArtifacts/
Package.StoreAssociation.xml
_pkginfo.txt
*.appx
*.appxbundle
*.appxupload

# Visual Studio cache files
# files ending in .cache can be ignored
*.[Cc]ache
# but keep track of directories ending in .cache
!?*.[Cc]ache/

# Others
ClientBin/
~$*
*~
*.dbmdl
*.dbproj.schemaview
*.jfm
*.pfx
*.publishsettings
orleans.codegen.cs

# Including strong name files can present a security risk
# (https://github.com/github/gitignore/pull/2483#issue-259490424)
#*.snk

# Since there are multiple workflows, uncomment next line to ignore bower_components
# (https://github.com/github/gitignore/pull/1529#issuecomment-104372622)
#bower_components/

# RIA/Silverlight projects
Generated_Code/

# Backup & report files from converting an old project file
# to a newer Visual Studio version. Backup files are not needed,
# because we have git ;-)
_UpgradeReport_Files/
Backup*/
UpgradeLog*.XML
UpgradeLog*.htm
ServiceFabricBackup/
*.rptproj.bak
# SQL Server files
*.mdf
*.ldf
*.ndf

# Business Intelligence projects
*.rdl.data
*.bim.layout
*.bim_*.settings
*.rptproj.rsuser
*- [Bb]ackup.rdl
*- [Bb]ackup ([0-9]).rdl
*- [Bb]ackup ([0-9][0-9]).rdl

# Microsoft Fakes
FakesAssemblies/

# GhostDoc plugin setting file
*.GhostDoc.xml

# Node.js Tools for Visual Studio
.ntvs_analysis.dat
node_modules/

# Visual Studio 6 build log
*.plg

# Visual Studio 6 workspace options file
*.opt

# Visual Studio 6 auto-generated workspace file (contains which files were open etc.)
*.vbw

# Visual Studio LightSwitch build output
**/*.HTMLClient/GeneratedArtifacts
**/*.DesktopClient/GeneratedArtifacts
**/*.DesktopClient/ModelManifest.xml
**/*.Server/GeneratedArtifacts
**/*.Server/ModelManifest.xml
_Pvt_Extensions

# Paket dependency manager
.paket/paket.exe
paket-files/

# FAKE - F# Make
.fake/

# CodeRush personal settings
.cr/personal

# Python Tools for Visual Studio (PTVS)
__pycache__/
*.pyc

# Cake - Uncomment if you are using it
# tools/**
# !tools/packages.config

# Tabs Studio
*.tss

# Telerik's JustMock configuration file
*.jmconfig

# BizTalk build output
*.btp.cs
*.btm.cs
*.odx.cs
*.xsd.cs

# OpenCover UI analysis results
OpenCover/

# Azure Stream Analytics local run output
ASALocalRun/

# MSBuild Binary and Structured Log
*.binlog

# NVidia Nsight GPU debugger configuration file
*.nvuser

# MFractors (Xamarin productivity tool) working folder
.mfractor/

# Local History for Visual Studio
.localhistory/

# BeatPulse healthcheck temp database
healthchecksdb

# Backup folder for Package Reference Convert tool in Visual Studio 2017
MigrationBackup/

# Ionide (cross platform F# VS Code tools) working folder
.ionide/

# Fody - auto-generated XML schema
FodyWeavers.xsd

C++

# Prerequisites
*.d

# Compiled Object files
*.slo
*.lo
*.o
*.obj

# Precompiled Headers
*.gch
*.pch

# Compiled Dynamic libraries
*.so
*.dylib
*.dll

# Fortran module files
*.mod
*.smod

# Compiled Static libraries
*.lai
*.la
*.a
*.lib

# Executables
*.exe
*.out
*.app